In Part I in my series on caper bushes, we learned what these plants look like, where to find them, how they grow, and why they make good additions to desert gardens. Today, I’ll share how to prepare the plant so you can savor their unique flavor.
You may already be familiar with capers, as they are a common ingredient used in Mediterranean cuisine and are available commercially in many places around the world. These are the flower buds of caper bushes, specifically Capparis spinosa. (Although C. sinaica, which also grows here in Sinai can be used, as well.)

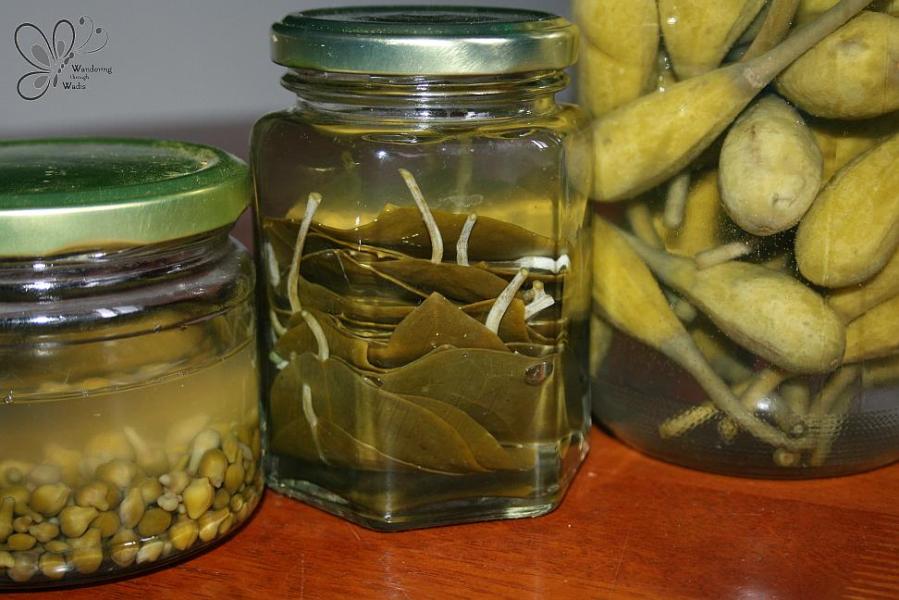
The buds are picked when small and then salted and/or pickled. They are used in salads, pastas, meat dishes, sauces, and are popular in salmon and other fish dishes.
Before the caper bush in my garden was big enough to supply enough flower buds for pickling – and even now as I prefer to leave our buds to grow into flowers and fruit – we would forage for the buds as we wandered through wadis. At the right time and place, it doesn’t take long to collect a handful of flower buds. We pick a variety of sizes, but try to keep them on the smaller side.

Once you’ve collected the flower buds, put them in a jar, fill with water, and cover with a cloth. Let the buds soak for 3 – 7 days, changing the water every day (or every other day). The buds will turn from a bright green color to a more olive color. They will also start to give off a strong smell and white crystals or film may appear. This is all normal. The buds are releasing their mustard oil and their not-so-nice flavor.
At the end of the week, the capers should be giving off less of an odor and are ready to be pickled. You can use a vinegar brine or, even simpler, a lacto-fermentation method which just involves salt water. That’s what I do. I mix 220 mL of water with 1 tablespoon of salt. (Or multiples of that when I need more water.) Put the caper buds in a clean, sterile jar and pour the salt water over them, making sure they are all covered. Leave them for 3-4 days and then put them in your fridge; they will last a long time.

Pickled flower buds are not part of the Bedouin culinary tradition, but pickled fruits are! Forage for fruit on the bushes in the wadi or collect them from your garden. You want to pick them when they are still green, not yet ripe. I generally pick them when they are between 5 – 8 cm long.

You can follow the same method for pickling as described above for the flower buds. The fruits definitely need 7 days in water before they are pickled and give off a much stronger odor than the buds. The pickled fruit are called caper berries in English.

This is my first year to do so, but you can also pickle the leaves of the caper bush following the same procedure.

Bedouin friends have recommended cutting shallow slashes into the fruit before they are pickled. This allows more of their flavor to be released into the water. Bedouin will then use a few spoons of this zesty liquid to spice up their lentil and rice meals.
We like to eat the pickled caper fruits smashed up in white cheese, which we then scoop up with local flat bread. Delicious! I am looking forward to experimenting with the pickled caper leaves – as a side salad, with deviled eggs, with cheese, with fish. And the flower buds we use in typical Mediterranean fashion, usually on pastas and pizzas.
The caper fruit can also be eaten fresh, when it is red and fully ripe. As I mentioned in my first post about capers, you have to beat the ants to it! Pick the red fruit just as it’s ready to split. If you catch them before they split, open the fruit and use your teeth to scrape the flesh and seeds off of the hard skin. Whether or not to chew the mustard-flavored seeds is up to you. The Bedouin children, who have eaten plenty of fruit from my garden, warn me never to chew the seeds, as they will give you diarrhea. But I’ve heard from other people who chew the seeds and do not suffer from any intestinal upset. I’ve tried the fruit fresh but did not chew the seeds. They taste okay, but I prefer them pickled!
Besides being beautiful and delicious, caper plants are also used medicinally by the Bedouin. (Amazing plant, right?) A poultice made from the crushed leaves is used to treat rheumatism, joint aches, headaches, and toothaches. Inhaling the vapor made when boiling ground dried leaves is said to treat head colds. I have used a poultice to treat joint aches and I can testify that the crushed leaves really do heat up, much better than creams from the pharmacy.
Okay, enough.
Have I convinced you to grow a caper bush in your garden yet? 😉

yes, you convinced me 😉
LikeLike
Yay! Let us know how it goes. 🙂
LikeLike
I’m saving this article so that I can pickle some capers when I get my caper bush!!
LikeLiked by 1 person
Pingback: Caper Bush ~ Part I – Wandering through Wadis