I’m thrilled to announce that the updated edition of Wandering through Wadis: A nature-lover’s guide to the flora of South Sinai is ready! It’s been four years since I published the first edition and I’ve spent a lot more time wandering, photographing, researching, and learning. I was able to add over 35 new plant species to the guidebook, bring the total number of plants in the directory to 142. I also added dozens of new and better quality images of the first-edition plants. The completely revised introduction now includes information about plant biology and the adaptations that desert plants employ to survive the harsh climate of Sinai, highlighting the fascinating lives of desert flora.
The Second Edition is available solely as an ebook. I have no plans at the moment to produce a print edition. I understand the love of paperbacks and the ease with which we can toss them into our backpacks, but the cost of paper and ink has doubled over the last year, as Egypt imports nearly two-thirds of what it needs from abroad. My book has over 170 pages and 450 photographs. That’s a lot of paper and ink. So, for now, it’s an e-version, a PDF file, which is easily read on tablets, iPads, laptops, and PCs. There is one bonus of reading the book on a device at least – the ability to zoom in on the images.
A memory popped up on my Facebook page today and it’s one of my favorites, so I thought I’d share it here. This post was originally published on May 6, 2014 on Bedouin History Desert Safari’s blog.
It’s spring – my favorite time of year in Sinai! Especially after a particularly wet winter since that means our desert plants are thriving and the goats and sheep have plenty to graze. Recently, we met Freyj, one of Bedouin History’s drivers and guides, at his daughter’s springtime camp in the desert. We were welcomed with smiles and a light lunch of fresh bread and goat milk. It didn’t take long for the children to wander over to see their grandfather and his foreign friends. Freyj knows well my passion for plants and photography and knew I would be eager to explore the surrounding desert. Recalling our failed attempts last year to locate one of the edible plants, Zeinab, one of Freyj’s young granddaughters, eagerly offered to get her digging tools and lead our exploration. So we set off with Zeinab, Farah, Mohamed, and Omar to forage for tummayr (تِمِّير), the Bedouin name for Erodium crassifolium.
Zeinab with her digging tool.
Known in English as Desert Storks-bill or Hoary-leaved Heron’s-bill, this plant has an edible tuber that grows deep in the ground. But there are eight different Erodium species growing in Sinai so finding the right one involves a knowledge of what tummayr leaves look like and where they grow. All Erodiums have fruit that look like long bird beaks, hence their common English name, but each species has distinct leaves.
Erodium fruit
Zeinab and the other children are a wealth of information about the local plants, especially the edible ones, as foraging for these are a favorite past time of the Bedouin children who live in the desert for a few months of the year.
Erodium crassifolium, (tummayr)
I followed Zeinab through the wadi, trying to keep up with her quick steps and even quicker digging abilities. I try to figure out which Storks-bills are the ones we are looking for and was cheered on by Zeinab when I correctly point out a large tummayr plant.
Zeinab digging for tubers.
Zeinab dug quickly, scanning the area to check on the progress of the boys, who are leading their own expedition with my husband. It seems that this had turned into a contest to see which “team” could find the most. But we are all successful and end up with handfuls of edible tubers! The children remove the skins with their fingernails and hand them to us to eat. The small potato-like tubers are sweet and crunchy.
Foraging with friends
Along the way, the children have also spotted sweet desert onions. They are so quick to dig these up that I never see what the plant looks like when it is still rooted in the earth. The onions, possibly an Allium species, are sweeter and juicier than the tummayr. And easier to reach as they are not buried so deep in the rocky ground.
Handful of collected onions and tubers.
We returned to camp to share our foraged goodies with the other adults at camp, but they showed little interest in eating our treats. It seems foraging with friends is a childhood habit, something to entertain them during the long days in the desert. How lucky I am to have such amazing young friends!
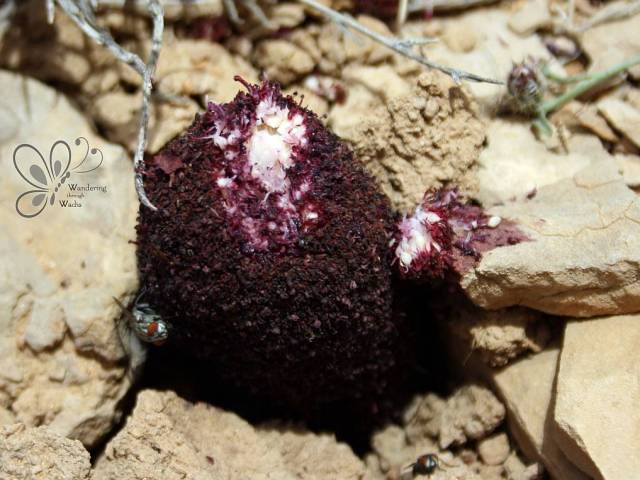
Desert Thumb (Cynomorium coccineum), aka Red Thumb or Tarthuth in Arabic, is not a common plant in Sinai. Growing in the spring only after a wet winter, this rare plant makes for a special spotting! I was intrigued when I came across these for the first time in 2014. I mistakenly thought they were mushrooms (so did the Maltese back in the 1600s so I’m not the only one!). With the help of my fellow nature lovers at Project Noah, I learned that these thumbs of the desert were actually plants.
But they are no ordinary plants! They are parasitic; they have no chlorophyll and cannot photosynthesize. Instead, they live most of their lives underground as a rhizome, attached to the roots of another plant. In Sinai, Desert Thumbs most likely parasitize salt bushes (Atriplex spp.), but they are also known to live off the roots of Amaranthus and Tamarix species.
The stalk emerges in the spring, covered by clusters of tiny dark red to purplish flowers. The flowers are pollinated by flies that are attracted to their cabbage-like aroma. Once pollinated and mature, the spike turns black and produces small, black, nut-like fruit.
Desert Thumbs are edible and are believed, throughout the region where they grow, to have an array of medicinal properties. In fact, Arab physicians during the Middle Ages referred to Desert Thumbs as “the treasure of drugs” because it was used to treat a range of problems from blood disorders to digestive and reproductive ailments. In Sinai, Bedouin have traditionally used these plants to cure colic.
Bedouin in Saudi Arabia have been harvesting tarthuth for thousands of years as food for themselves and their camels. Tarthuth has been especially useful during long caravan treks through the desert as well as during times of famine. The spikes are cleaned and the outer skin is peeled off. The inner white flesh is reported to be like an apple – sweet, crisp, and juicy.
If I had known that three years ago, I definitely would have tasted this plant! We’ve had a relatively wet winter this year, so maybe I’ll get lucky and have another chance to sample a Desert Thumb this spring. I’ll be sure to let you know. 🙂
This is one of my favorite times of year to wander through the wadis of Sinai. For many reasons. Because of recent rains, the wadis are bursting with tiny green baby plants right now. I always enjoy stopping to discover what plants come up first after the rains, and what they look like when they’re so young. Fascinating! For me. 🙂 Another reason I love this time of year is that the arghel plants are in bloom – and they give off such a delightful fragrance!
Some wadis, like Wadi Kid, are lined with arghel plants (Solenostemma arghel), called harjal in Arabic. If you are lucky enough to walk through one of these wadis in November, it will be a joy for your senses! Often you will smell the flowers before you turn a corner and see the plant.
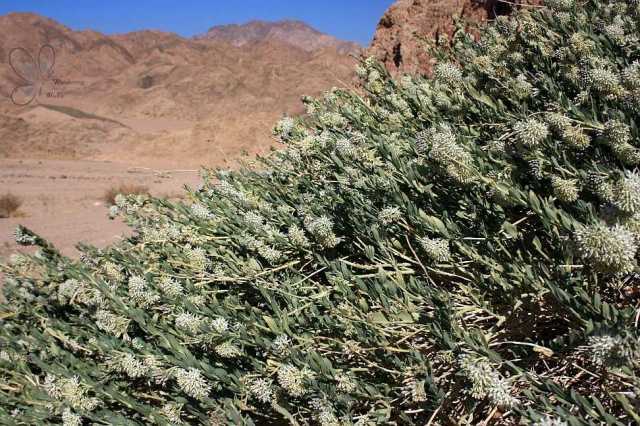
Harjal is an evergreen shrub in the dogbane family. The plants grow up to 1 meter high and 10 meters in diameter. They live in gravelly, sandy, and rocky soils usually at the edge of wadi beds. Here’s a picture of a large harjal plant growing near Wadi Connection in Dahab:
The leaves are greyish-green and their white flowers grow in bunches. The fruits are purplish-green, oval shaped, and can grow up to 5 cm in length.
When they are ripe, they turn yellow and dry to a light brown. They split open, releasing dozens of tufted seeds that are blown by the wind.
Bedouin in Sinai use this plant for medical reasons, as do many people throughout Egypt. Sadly, this plant is endangered due to over-collection for sale at herb shops dealing in medicinal herbs. Locally, the stem and leaves are used to treat a variety of ailments – infected sores and cuts, coughs and colic.
I’m not the only one attracted to these fragrant blooms! Butterflies, bees, and other pollinators are drawn to the flowers’ sweet nectar. In the picture below you can see two orange Painted Lady butterflies – the species I see most often on the harjal flowers – and a Brown-veined White butterfly.
In Part I in my series on caper bushes, we learned what these plants look like, where to find them, how they grow, and why they make good additions to desert gardens. Today, I’ll share how to prepare the plant so you can savor their unique flavor.
You may already be familiar with capers, as they are a common ingredient used in Mediterranean cuisine and are available commercially in many places around the world. These are the flower buds of caper bushes, specifically Capparis spinosa. (Although C. sinaica, which also grows here in Sinai can be used, as well.)
The buds are picked when small and then salted and/or pickled. They are used in salads, pastas, meat dishes, sauces, and are popular in salmon and other fish dishes.
Before the caper bush in my garden was big enough to supply enough flower buds for pickling – and even now as I prefer to leave our buds to grow into flowers and fruit – we would forage for the buds as we wandered through wadis. At the right time and place, it doesn’t take long to collect a handful of flower buds. We pick a variety of sizes, but try to keep them on the smaller side.
Caper flower buds foraged from a wadi near Dahab.
Once you’ve collected the flower buds, put them in a jar, fill with water, and cover with a cloth. Let the buds soak for 3 – 7 days, changing the water every day (or every other day). The buds will turn from a bright green color to a more olive color. They will also start to give off a strong smell and white crystals or film may appear. This is all normal. The buds are releasing their mustard oil and their not-so-nice flavor.
At the end of the week, the capers should be giving off less of an odor and are ready to be pickled. You can use a vinegar brine or, even simpler, a lacto-fermentation method which just involves salt water. That’s what I do. I mix 220 mL of water with 1 tablespoon of salt. (Or multiples of that when I need more water.) Put the caper buds in a clean, sterile jar and pour the salt water over them, making sure they are all covered. Leave them for 3-4 days and then put them in your fridge; they will last a long time.
Pickled flower buds – and one fruit – ready to be eaten.
Pickled flower buds are not part of the Bedouin culinary tradition, but pickled fruits are! Forage for fruit on the bushes in the wadi or collect them from your garden. You want to pick them when they are still green, not yet ripe. I generally pick them when they are between 5 – 8 cm long.
The first harvest of the season from my garden caper bush.
You can follow the same method for pickling as described above for the flower buds. The fruits definitely need 7 days in water before they are pickled and give off a much stronger odor than the buds. The pickled fruit are called caper berries in English.
Fruits need to soak for 7 days before pickling.
This is my first year to do so, but you can also pickle the leaves of the caper bush following the same procedure.
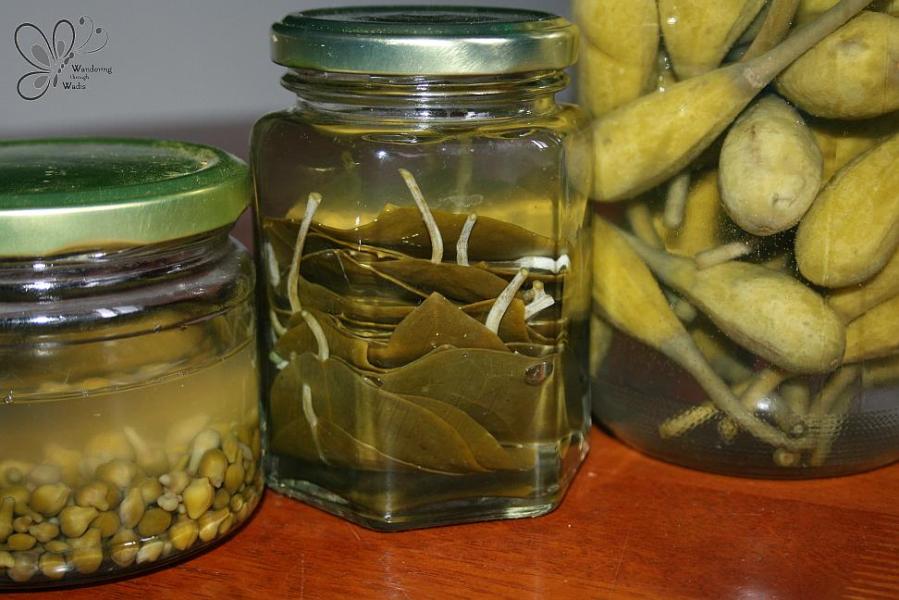
Pickled flower buds, leaves, and fruit.
Bedouin friends have recommended cutting shallow slashes into the fruit before they are pickled. This allows more of their flavor to be released into the water. Bedouin will then use a few spoons of this zesty liquid to spice up their lentil and rice meals.
We like to eat the pickled caper fruits smashed up in white cheese, which we then scoop up with local flat bread. Delicious! I am looking forward to experimenting with the pickled caper leaves – as a side salad, with deviled eggs, with cheese, with fish. And the flower buds we use in typical Mediterranean fashion, usually on pastas and pizzas.
The caper fruit can also be eaten fresh, when it is red and fully ripe. As I mentioned in my first post about capers, you have to beat the ants to it! Pick the red fruit just as it’s ready to split. If you catch them before they split, open the fruit and use your teeth to scrape the flesh and seeds off of the hard skin. Whether or not to chew the mustard-flavored seeds is up to you. The Bedouin children, who have eaten plenty of fruit from my garden, warn me never to chew the seeds, as they will give you diarrhea. But I’ve heard from other people who chew the seeds and do not suffer from any intestinal upset. I’ve tried the fruit fresh but did not chew the seeds. They taste okay, but I prefer them pickled!
Besides being beautiful and delicious, caper plants are also used medicinally by the Bedouin. (Amazing plant, right?) A poultice made from the crushed leaves is used to treat rheumatism, joint aches, headaches, and toothaches. Inhaling the vapor made when boiling ground dried leaves is said to treat head colds. I have used a poultice to treat joint aches and I can testify that the crushed leaves really do heat up, much better than creams from the pharmacy.
Okay, enough.
Have I convinced you to grow a caper bush in your garden yet? 😉
Caper bushes (Capparis spp.) are some of the most common plants that you will come across when wandering through the wadis of South Sinai. They are also one of my favorites and one of my most photographed. So, I have a lot to say about them and too many photos. You’ve been forewarned. 😉
There are three species of capers growing in Sinai: Capparis decidua, C. sinaica, and two different subspecies of C. spinosa. C. decidua, which I have never seen, is easily distinguished from the other Capparis species. It grows as a small tree and the others are bushes. In English, we call them all capers, but the Bedouin differentiate between them. In Arabic, C. spinosa is called lasoof and C.sinaica is called lasaf.
Caper bushes are shrubs growing between 1 and 2.5 meters high. They usually grow prostrate along the ground, scrambling over rocks, or hanging in cliffs. Capers can tolerate saline soil and drought. And they love dry heat and direct sunlight! (This makes them excellent additions to desert gardens. More on that later.)
Capparis spinosa – Ain Yarqa
The branches are smooth and hairless and grow out from the base of the plant. The leaves are thick and fleshy and those of C. spinosa are round or oval while the leaves of C. sinaica are shaped more like an egg, getting narrower near the tip. The flowers – oh, the flowers! – are white with lots of stamen. In C. sinaica, these stamens are initially white but turn purple as they begin to wilt. In C. spinosa, they are white and pinkish-purple from the start and turn a darker purple. Both blooms are simply stunning!
Capparis spinosa
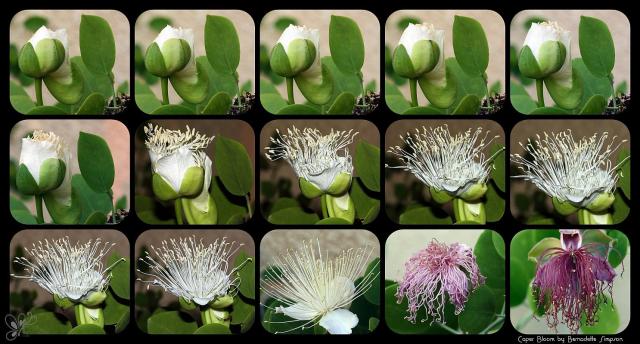
Flower buds grow only on first-year branches, bloom at night, and live only for 24 hours. It is amazing to watch the blooms open, and since I have a caper bush in my own garden, I’ve had plenty of opportunities to do so.
I am seriously in love with these flowers and how their color changes throughout the day!
The fruits of these caper bushes are pretty amazing as well. They are somewhat pear-shaped; the young fruit are green, turning a brilliant red when ripe, and contain hundreds of small seeds. And they’re edible! (More on that later, too.)
Caper bushes often have buds, flowers, and fruit at the same time. They start blooming in May and will continue to do so until late summer. When you come across these bushes in the wadis, you’ll often find the ants or other critters have already munched the seeds of the burst fruit.
But if you have a caper bush in your own garden, you can beat the ants to the feast!
When we bought our land in Dahab nine years ago, we built our house and had an empty desert plot in front, a blank canvas, our garden. We planned on growing only local desert plants, and, for the most part, our little garden is made up of the same bushes and herbs you find growing in the desert wadis of South Sinai. Our plan definitely included a caper bush. I wanted one right underneath the front window.
Irena Springuel recommends capers in her book The Desert Garden: A Practical Guide because of their beautiful blooms and edible parts. She does warn, however, of the thorns and recommends keeping that in mind when choosing a planting site. You wouldn’t want visitors or children getting hurt by the spines. (And they do catch you! My husband and I have both been hooked on numerous occasions and it hurts.)
The notes that Springuel gives about propagating capers (C. spinosa) made me think it would be a challenge to grow a caper bush from seed. But I collected a ripe fruit from a bush (C. sinaica) in a nearby wadi and simply planted the seeds in a clay pot at home. Several sprouts grew and they continue to thrive in my garden today. We have a beautiful large bush now, exactly where I dreamed of having one, and it is producing loads of fruit. You can also propagate capers by cuttings, which we have done successfully, too.
If you’re looking for a beautiful, low-maintenance plant for your garden, try a caper bush! Many of the bushes around Dahab are fruiting right now, so it’s the perfect time to see them and collect seeds. In my next post, Caper Bush ~ Part II, I’ll tell you all about which parts of the plant you can eat, how to process and prepare them, and how the Bedouin use capers medicinally.
References:
Springuel, Irina. (2006). The Desert Garden: A Practical Guide. Cairo: The American University in Cairo Press.